Teeth Whitening — Day-Glo White or Keeping It Real?
Walk through any cosmetic-dentistry website and you’ll see a lot of teeth that don’t look quite right — the brilliant white that screams “veneers” or “filter” rather than “actual person”. Sam wrote this for the readers who want their teeth whiter, not whitened-into-a-feature.
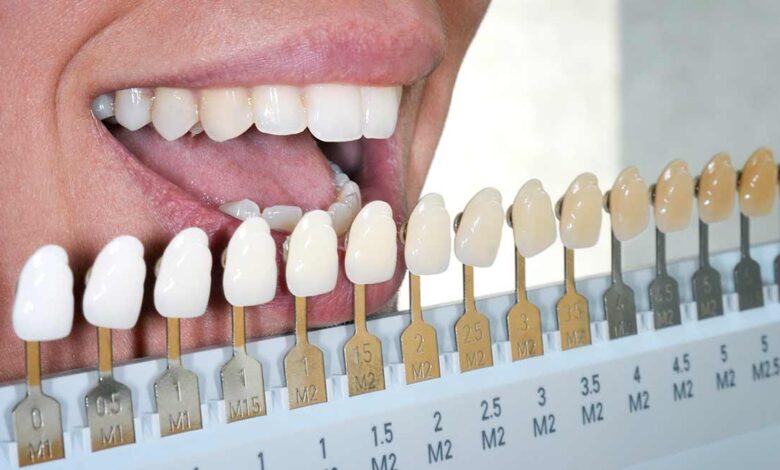
The Vita shade scale (and why your dentist talks about it)
Dentists describe tooth colour using shade guides — most commonly the Vita Classical scale. Without going deep into the chart:
- A1, B1 — natural-bright. The ceiling of “looks like real teeth in great condition”.
- A2, B2 — typical Australian healthy adult.
- A3 onwards — what most adults’ teeth drift toward by their 40s, especially with coffee/tea/wine.
- BL1–BL4 — the “bleached” range. Whiter than the natural human tooth ceiling. This is what people mean by “Hollywood white”.
Professional whitening will reliably take you 4–8 shades up the scale. It can’t take you past your enamel’s underlying limit — if your natural shade ceiling is A1, you can’t whiten to BL2 without changing the underlying tooth (i.e. veneers).
How whitening actually works
The active ingredient is hydrogen peroxide (or carbamide peroxide, which breaks down into hydrogen peroxide). It penetrates enamel into the underlying dentine and oxidises the long-chain pigment molecules that have built up over time. The pigments break into smaller, less visible molecules. The tooth structure itself isn’t changed — just the colour-bearing molecules within it.
This is why professional whitening genuinely works and supermarket whitening toothpaste essentially doesn’t (it’s abrasive surface-stain removal only).
Side effects worth knowing
- Sensitivity — common, usually 24–72 hours. Sensitive-teeth toothpaste used for a week before treatment helps a lot.
- Gum irritation if gel touches gums — minimal with custom trays or in-chair gum protection; common with poorly-fitting strips.
- Uneven result on existing restorations — composite, porcelain veneers and crowns don’t whiten with the natural teeth. If you have visible front-tooth restorations, plan around this before whitening.
- Temporary “drying” appearance — fresh-from-treatment teeth can look chalky for the first 24 hours as they rehydrate. They settle.
How to decide what shade to aim for
- Look at the whites of your eyes. Teeth that are significantly whiter than your eye whites read as fake under most lighting.
- Look at family photos from a decade ago. If your teeth used to be A1, getting back to A1 is the realistic goal.
- Bring a reference photo to the consult. Most dentists are happy to discuss target shades against the Vita guide.
- Don’t trust selfie-camera filters. Most phone cameras boost saturation and white balance — what looks “great in selfies” reads as “obviously cosmetic” in real life.